Deep Learning Model using Seq2seq and Attention Mechanisms
Machine translation algorithm
Project Details
- Category: Natural Language Processing
- Language: Python (with TensorFlow)
- Date: August 2023
- GitHub: Project Repository
- Project Notebook (in French)
This project aims to automate French-to-English text translation using Seq2Seq with attention mechanisms, covering data preparation, tokenization, text vectorization, and model training. The goal is to build an efficient and accurate translation pipeline that understands French sentences and generates high-quality English translations. I followed the TensorFlow tutorials to implement the Seq2Seq architecture, along with attention mechanisms. It enabled the model to capture language patterns and context effectively, leading to improved translation quality. The outcome is a powerful tool for automatic translation, contributing to advancements in natural language processing (NLP).
Example of Use
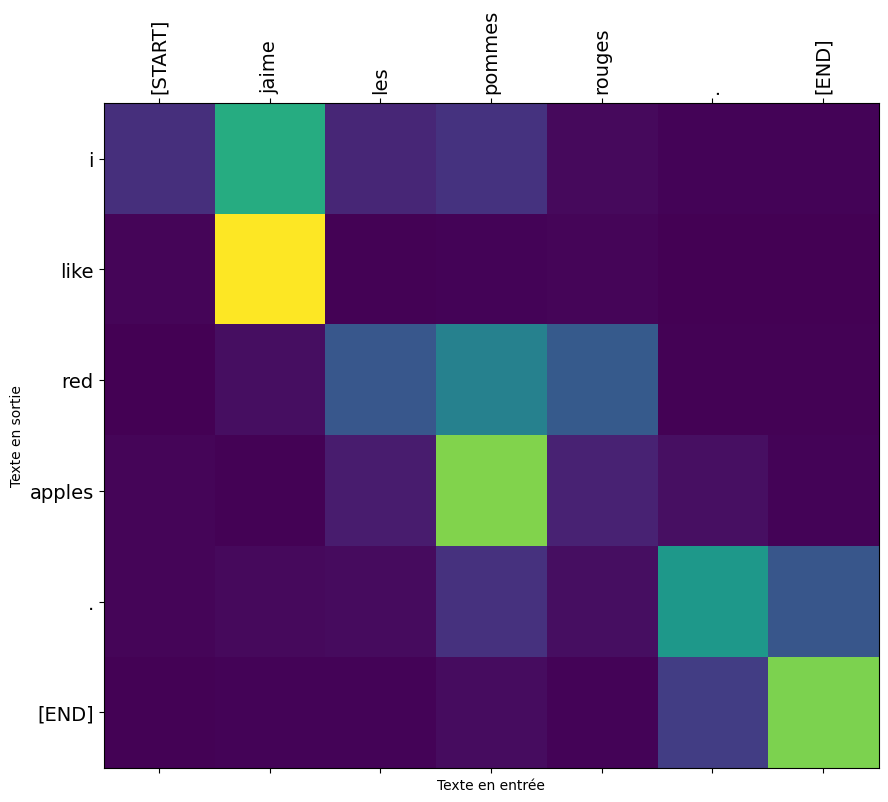
Here, my model received only the following sentence as input: "J'aime les pommes rouges." which it automatically translated into English as: "I like red apples." We can visualize, thanks to the color code, the attention that my model pays to each word when translating them one by one.
Installation of packages
In this section, we install the
einops and tensorflow-text packages. These packages are essential for data manipulation and natural language processing with TensorFlow.
-
einops is a Python library that allows flexible and expressive manipulation of tensor axes. It facilitates the rearrangement of dimensions and data processing in neural networks.
-
tensorflow-text is an extension of TensorFlow specifically designed for natural language processing (NLP). It provides various text preprocessing functionalities and text encoding methods for use with NLP models.
Libraries and modules
In this section, we import the necessary libraries and modules for the rest of the code. Here's an explanation of the main imports:
-
numpy is a Python library used for numerical calculations and operations on multidimensional arrays (real numbers, vectors, matrices, etc.).
-
typing is a Python module that provides features for annotating types in the code. It is used here to specify the types of function arguments and return values.
-
einops has already been explained previously during its installation.
-
matplotlib.pyplot is used to create visualizations, including graphs and plots.
-
matplotlib.ticker is used for managing marks and labels on graph axes.
Finally, we import tensorflow and tensorflow_text, which are the main libraries for creating neural network models and natural language processing with TensorFlow.
Data manipulation
Verification class
In this subsection, we define a class called ShapeChecker that helps us verify the shapes of tensors during data manipulation. This class is particularly useful to ensure dimension compatibility when using neural network models.
The ShapeChecker class has a __call__ method, which takes a tensor and a list of axis names and performs shape checking. If TensorFlow is in eager execution mode (interactive mode), the verification is performed. Otherwise, nothing happens, which is convenient when training models.
The verification process involves examining the shape of the tensor and comparing each dimension with the given names. If an axis name is encountered for the first time, its length is added to the class's cache. If an axis name has been seen before, its current length is compared to the old one. If the lengths do not match, an error is raised to report a dimension conflict.
This class is a valuable tool to ensure that data complies with model specifications, thereby avoiding potential errors during training and prediction.
Dataset download
In this subsection, we download a file containing the data for our English-French translation model. The data comes from a text file in TSV (tab-separated values) format, where each line represents a pair of sentences (English and French) separated by a tab.
We use the pathlib library to handle file paths and the tf.keras.utils.get_file() function to download the file. The download link points to a commonly used translation dataset.
Once the file is downloaded, we load the data by reading the text, splitting the lines, and separating the English and French sentences to form lists of contexts (context_raw) and targets (target_raw). We then display the last French and English sentences to verify that the data loading was done correctly.
Training and validation datasets
In this subsection, we prepare the data for training our English-French translation model. We split the data into two sets: a training set and a validation set.
We define two sets of booleans, is_train and is_val, using a uniform random distribution to distribute examples between the two sets. Approximately 80% of the examples are for training (is_train=True), and the rest are for validation (is_val=False).
We then use these sets of booleans to extract the indices of training and validation examples from the context_raw and target_raw lists.
Finally, we create two TensorFlow datasets (train_raw and val_raw) using the corresponding indices for training and validation sets. These datasets will be used to train and validate our translation model.
Note that we shuffle the examples when creating the datasets to ensure variability during training. We also batch the examples (BATCH_SIZE) to improve the efficiency of the training process.
In conclusion, this part prepares the data for our English-French translation model by splitting the data into training and validation sets and transforming them into TensorFlow datasets ready to be used in the model.
Preprocessing
Text standardization
In this subsection, we preprocess the text before using it to train our translation model. The purpose of preprocessing is to normalize the text by eliminating variations due to special characters and case, and transforming it into a sequence of tokens.
We use the example text "Êtes-vous un chercheur en Intelligence Artificielle?" to illustrate the normalization process. First, we use the tf_text.normalize_utf8() function to decompose the characters into their compatible forms (NFKD) and transform them into normalized Unicode text. Then, we convert the text to lowercase and remove any character that is not an English alphabet letter, space, period, question mark, comma, or exclamation point. We also add spaces around punctuation to separate them as distinct tokens.
Finally, we add special tokens [START] and [END] around the text to indicate the beginning and end of the token sequence. This step is essential for translation models to know when to start and end text generation.
Preprocessing standardizes the text and transforms it into a sequence of tokens ready to be used by the translation model.
Vectorization
In this subsection, we perform the vectorization of textual data to prepare the input for our translation model. Vectorization involves converting words into numerical indices (tokens) using a vocabulary dictionary.
We define a maximum size for the
vocabulary (max_vocab_size) that will limit the number of words considered for indexing. Then, we create two text processors, one for context (English) and the other for the target (French).
Each processor is a text vectorization layer, which takes the normalized text (from the previous subsection) and transforms it into sequences of tokens. We use the tf.keras.layers.TextVectorization function for this, specifying the normalization function, the maximum vocabulary size, and the option ragged=True to indicate that the sequences will have variable lengths.
Next, we "adapt" the text processors to the training data using the .adapt() method with the training dataset. This allows the text processors to learn the vocabulary using the training data.
We then display the first 10 words of the vocabulary to verify what the text processors have learned.
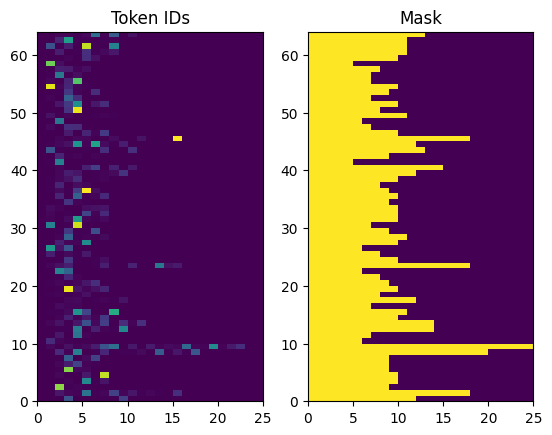
Finally, we use the text processors to convert the examples of contextual strings into sequences of numerical tokens. This allows us to check if tokenization is working correctly and to display a visual representation of the generated tokens and their mask (where tokens are present and where they are not).
Vectorization prepares the textual data by converting words into numerical indices (tokens) for processing by the translation model.
The Encoder/Decoder Model
In this section, we define the English-French translation model using the encoder-decoder architecture. This model is a commonly used architecture for translation and text generation tasks.
We use encoding and attention layers to capture the semantic information from the input sentences and generate the translations as output.
UNITS represents the number of units (neurons) for the encoding and attention layers. This parameter is set to 256, but it can be adjusted based on the needs and complexity of the model.
The encoder-decoder model is a powerful architecture that can be trained to generate high-quality translations based on the training sentence pairs. The combination of text vectorization, preprocessing, and the model architecture will result in an efficient and accurate translation system.
The Encoder
In this subsection, we implement the custom encoder layer. The encoder transforms a sequence of text into a sequence of vectors. It uses two main components: the embedding layer and a bidirectional RNN layer.
- The embedding layer (self.embedding) is used to convert tokens (words) into dense vectors. This allows representing the text in a continuous way and facilitates learning the relationships between words. The embedding is specified by the number of units (units) that each word will be represented with.
- The bidirectional RNN layer (self.rnn) processes the embedding vectors sequentially. It takes the embedding vectors as input and returns a sequence of hidden states, capturing the contextual information in both forward and backward directions of the text. The merge_mode='sum' option means that the outputs from both directions are summed.
The call method of the encoder takes an input sequence x and performs the following operations:
1. Convert tokens into embedding vectors using the embedding layer.
2. Process the embedding vectors with the bidirectional RNN layer (self.rnn).
3. Return the processed sequence.
The convert_input method is used to convert raw text into its encoded representation using the encoder. It takes a text as input, converts it into tokens, and passes it to the encoder to obtain the corresponding embedding vectors.
The Attention Layer
In this subsection, we define the custom attention layer (CrossAttention). This layer allows the model to focus on specific parts of the context during translation.
- The layer uses tf.keras.layers.MultiHeadAttention (self.mha), which is an attention mechanism that processes information in multiple ways simultaneously.
- self.layernorm is a normalization layer that improves the stability of learning.
- self.add combines the attention outputs with the previous outputs.
The call method of the attention layer takes a sequence x and the context context as input. It performs the following operations:
1. Obtain the attention weights and output using tf.keras.layers.MultiHeadAttention.
2. Combine the outputs using self.add.
3. Normalize the outputs using self.layernorm.
This layer is used in the decoder to focus on the relevant context during translation generation.
The Decoder
In this subsection, we implement the custom decoder class. The decoder takes the encoded context and generates a target sequence (translation) word by word.
The decoder has several important components:
- self.word_to_id and self.id_to_word are layers for converting words to unique identifiers and vice versa. They are used to manage the vocabulary of the target sequences.
- self.start_token and self.end_token represent the identifiers of the start and end tokens of the sequence. They are used to indicate when to start and stop generating the translation.
- self.embedding is an embedding layer to convert token identifiers into embedding vectors.
- self.rnn is an RNN layer (GRU) used to process the target sequences.
- self.attention is the attention layer (CrossAttention) used to focus on the context during translation generation.
- self.output_layer is a dense layer that predicts the next token based on the decoder outputs.
The call method of the decoder takes the encoded context context, input tokens x, decoder state state, and a return_state option. It performs the following operations:
1. Convert input tokens into embedding vectors using the embedding layer.
2. Process the input sequence with the RNN layer to obtain the output sequence x.
3. Use the attention layer to focus on the relevant context during translation generation.
4. Predict the next token with the output layer.
The get_initial_state method is used to initialize the decoder state before translation. It returns the start token for each batch sequence, initializes the "done" variable to false for all sequences, and returns the initial state of the RNN.
The tokens_to_text method converts tokens to text using the reversed dictionary self.id_to_word. It joins the words to form a sentence and removes the start and end tokens.
The get_next_token method is used to predict the next token during translation generation. It takes the context, the next token, the decoder state, the "done" variable (indicating if a sequence is finished), and a temperature option for random generation. If the temperature is 0, the token is chosen with the highest probability (deterministic mode). Otherwise, the token is chosen randomly based on the logits (stochastic mode). This method is used to iterate over the tokens and generate the complete translation word by word.
The Model
In this section, we create a class Translator to combine the encoder and decoder into a complete translation model. The Translator class inherits from tf.keras.Model, which allows us to define the call method to perform translation.
The call method takes a tuple inputs containing the context and the target sequence x as input. It performs the following operations:
1. Execute the encoder to obtain the encoded context from the input context (context = self.encoder(context)).
2. Execute the decoder to obtain the output logits using the encoded context and the target sequence (logits = self.decoder(context, x)).
We also define a translation method (translate) for the Translator model. This method takes raw text as input and returns its translation using the trained model. It uses the encoder to convert the raw text into its encoded representation (context = self.encoder.convert_input(texts)), and then uses the decoder to generate the translation word by word using the get_next_token method of the decoder.
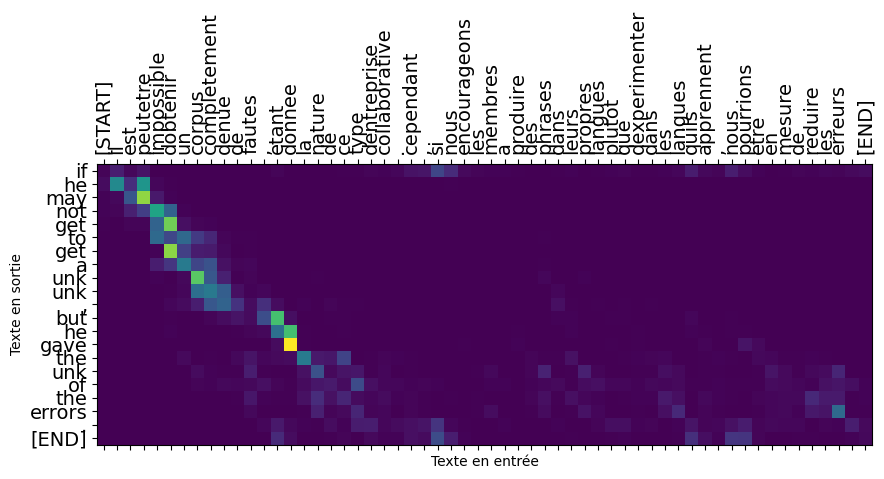
We also add a method to visualize the attention during translation (plot_attention). This method takes raw text as input, uses the model to translate it, and displays the attention weights on a matrix to visualize which parts of the context were used to generate each word of the translation.
Training
In this subsection, we define custom loss and accuracy functions for the model, tailored to the sequence-to-sequence training process.
- The masked_loss function calculates the loss while ignoring padding tokens. This is necessary because the target sequences can have different lengths and are padded with padding tokens. By masking these padding tokens, the loss is only calculated on relevant tokens.
- The masked_acc function also calculates accuracy while ignoring padding tokens. Just like masked loss, masked accuracy ensures that the metric is only calculated on relevant tokens and ignores padding tokens.
Next, we compile the model using an optimizer, masked loss function, and masked metrics. We use the Adam optimizer for weight updates, and we use the masked loss and accuracy functions to evaluate the model's errors and monitor its performance during training.
Finally, we evaluate the model's performance on a validation dataset to see its initial performance before training.
Then, we use the fit method to train the model on the training data. We repeat the training data for multiple epochs and use validation to monitor performance. We also use the tf.keras.callbacks.EarlyStopping callback to stop training if the loss does not improve for a certain number of consecutive epochs. This prevents unnecessary overfitting and allows us to choose the best model based on its performance on the validation data.
Results Visualization
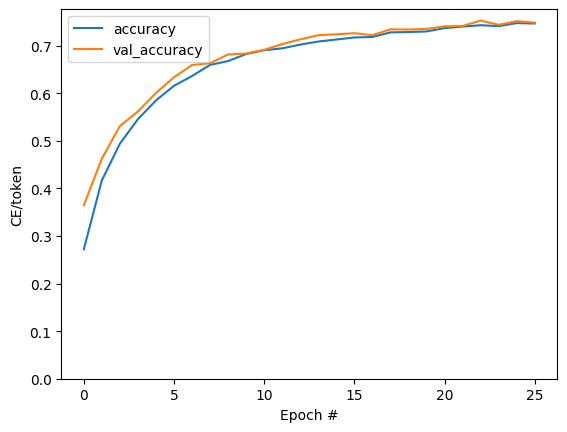
In this subsection, we visualize the training results by plotting the loss and accuracy curves during training. This allows us to see how the loss and accuracy change over epochs and helps in evaluating the model's performance.

Translation
Finally, in this subsection, we add a translation method to the Translator class. This method takes raw text as input and returns its translation using the trained model.
We use the encoder to convert the raw text into its encoded representation. Then, we initialize the variables for the token generation loop and iterate to generate the next token until reaching the maximum length of the output or until all sequences are finished. We use the get_next_token method of the decoder to generate the next token based on the attention weights computed by the attention layer. Finally, we concatenate the lists of tokens to obtain the complete translation and return it.
We also add a plot_attention method to visualize the attention weights during translation. This method takes raw text as input, uses the model to translate it, and displays the attention weights on a matrix to visualize which parts of the context were used to generate each word of the translation.
Visualizing Attention
In this subsection, we test the visualization of attention weights during translation. We use the plot_attention method of the model to display the attention weights between the input text and the generated translation. We first test on a short example and then on a longer text.
Results Analysis
In this section, we examine the training results and perform various analyses on the model.
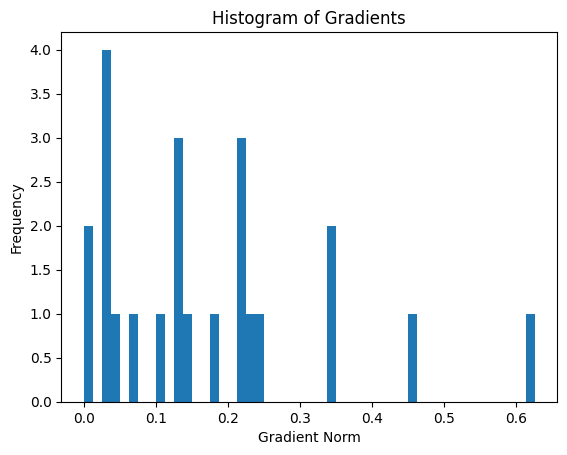
Gradient Histogram
This plot will give you an idea of the magnitude of gradients during training. We display a histogram of the gradient norms to get an idea of their magnitude during training. This can help us check if the gradients are too small or too large, which could affect the convergence of training.
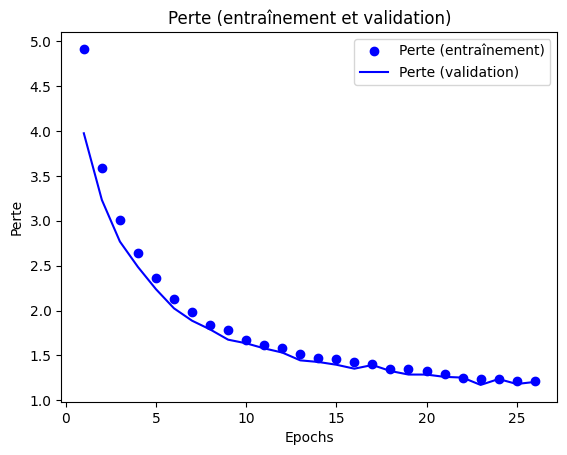
Epoch Loss Curve
We plot a curve to visualize the evolution of training loss and validation loss over epochs. This allows us to see how the loss changes during training and identify any overfitting or underfitting trends.
Loss vs. Time Curve
We record the time taken for each training epoch and plot a curve to visualize the loss against the elapsed time. This allows us to see if the loss gradually decreases over time and if the training progresses efficiently.

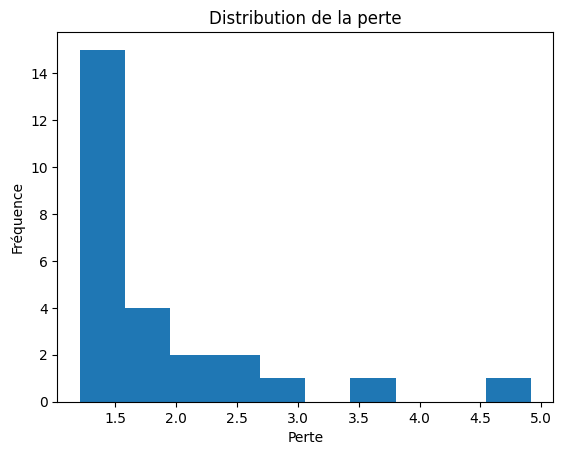
Histogram of Loss Distribution
We plot a histogram to visualize the distribution of loss values during training. This can give us an idea of the variability of the loss and the stability of the training process.
Results Recording
Finally, we save the trained model using the save method of Keras, as well as the training history as a pickle file for future reuse.
In this subsection, we download a file containing the data for our English-French translation model. The data comes from a text file in TSV (tab-separated values) format, where each line represents a pair of sentences (English and French) separated by a tab.
We use the
pathlib library to handle file paths and the tf.keras.utils.get_file() function to download the file. The download link points to a commonly used translation dataset.
Once the file is downloaded, we load the data by reading the text, splitting the lines, and separating the English and French sentences to form lists of contexts (
context_raw) and targets (target_raw). We then display the last French and English sentences to verify that the data loading was done correctly.
Training and validation datasets
In this subsection, we prepare the data for training our English-French translation model. We split the data into two sets: a training set and a validation set.
We define two sets of booleans, is_train and is_val, using a uniform random distribution to distribute examples between the two sets. Approximately 80% of the examples are for training (is_train=True), and the rest are for validation (is_val=False).
We then use these sets of booleans to extract the indices of training and validation examples from the context_raw and target_raw lists.
Finally, we create two TensorFlow datasets (train_raw and val_raw) using the corresponding indices for training and validation sets. These datasets will be used to train and validate our translation model.
Note that we shuffle the examples when creating the datasets to ensure variability during training. We also batch the examples (BATCH_SIZE) to improve the efficiency of the training process.
In conclusion, this part prepares the data for our English-French translation model by splitting the data into training and validation sets and transforming them into TensorFlow datasets ready to be used in the model.
Preprocessing
Text standardization
In this subsection, we preprocess the text before using it to train our translation model. The purpose of preprocessing is to normalize the text by eliminating variations due to special characters and case, and transforming it into a sequence of tokens.
We use the example text "Êtes-vous un chercheur en Intelligence Artificielle?" to illustrate the normalization process. First, we use the tf_text.normalize_utf8() function to decompose the characters into their compatible forms (NFKD) and transform them into normalized Unicode text. Then, we convert the text to lowercase and remove any character that is not an English alphabet letter, space, period, question mark, comma, or exclamation point. We also add spaces around punctuation to separate them as distinct tokens.
Finally, we add special tokens [START] and [END] around the text to indicate the beginning and end of the token sequence. This step is essential for translation models to know when to start and end text generation.
Preprocessing standardizes the text and transforms it into a sequence of tokens ready to be used by the translation model.
Vectorization
In this subsection, we perform the vectorization of textual data to prepare the input for our translation model. Vectorization involves converting words into numerical indices (tokens) using a vocabulary dictionary.
We define a maximum size for the
vocabulary (max_vocab_size) that will limit the number of words considered for indexing. Then, we create two text processors, one for context (English) and the other for the target (French).
Each processor is a text vectorization layer, which takes the normalized text (from the previous subsection) and transforms it into sequences of tokens. We use the tf.keras.layers.TextVectorization function for this, specifying the normalization function, the maximum vocabulary size, and the option ragged=True to indicate that the sequences will have variable lengths.
Next, we "adapt" the text processors to the training data using the .adapt() method with the training dataset. This allows the text processors to learn the vocabulary using the training data.
We then display the first 10 words of the vocabulary to verify what the text processors have learned.
Finally, we use the text processors to convert the examples of contextual strings into sequences of numerical tokens. This allows us to check if tokenization is working correctly and to display a visual representation of the generated tokens and their mask (where tokens are present and where they are not).
Vectorization prepares the textual data by converting words into numerical indices (tokens) for processing by the translation model.
The Encoder/Decoder Model
In this section, we define the English-French translation model using the encoder-decoder architecture. This model is a commonly used architecture for translation and text generation tasks.
We use encoding and attention layers to capture the semantic information from the input sentences and generate the translations as output.
UNITS represents the number of units (neurons) for the encoding and attention layers. This parameter is set to 256, but it can be adjusted based on the needs and complexity of the model.
The encoder-decoder model is a powerful architecture that can be trained to generate high-quality translations based on the training sentence pairs. The combination of text vectorization, preprocessing, and the model architecture will result in an efficient and accurate translation system.
The Encoder
In this subsection, we implement the custom encoder layer. The encoder transforms a sequence of text into a sequence of vectors. It uses two main components: the embedding layer and a bidirectional RNN layer.
- The embedding layer (self.embedding) is used to convert tokens (words) into dense vectors. This allows representing the text in a continuous way and facilitates learning the relationships between words. The embedding is specified by the number of units (units) that each word will be represented with.
- The bidirectional RNN layer (self.rnn) processes the embedding vectors sequentially. It takes the embedding vectors as input and returns a sequence of hidden states, capturing the contextual information in both forward and backward directions of the text. The merge_mode='sum' option means that the outputs from both directions are summed.
The call method of the encoder takes an input sequence x and performs the following operations:
1. Convert tokens into embedding vectors using the embedding layer.
2. Process the embedding vectors with the bidirectional RNN layer (self.rnn).
3. Return the processed sequence.
The convert_input method is used to convert raw text into its encoded representation using the encoder. It takes a text as input, converts it into tokens, and passes it to the encoder to obtain the corresponding embedding vectors.
The Attention Layer
In this subsection, we define the custom attention layer (CrossAttention). This layer allows the model to focus on specific parts of the context during translation.
- The layer uses tf.keras.layers.MultiHeadAttention (self.mha), which is an attention mechanism that processes information in multiple ways simultaneously.
- self.layernorm is a normalization layer that improves the stability of learning.
- self.add combines the attention outputs with the previous outputs.
The call method of the attention layer takes a sequence x and the context context as input. It performs the following operations:
1. Obtain the attention weights and output using tf.keras.layers.MultiHeadAttention.
2. Combine the outputs using self.add.
3. Normalize the outputs using self.layernorm.
This layer is used in the decoder to focus on the relevant context during translation generation.
The Decoder
In this subsection, we implement the custom decoder class. The decoder takes the encoded context and generates a target sequence (translation) word by word.
The decoder has several important components:
- self.word_to_id and self.id_to_word are layers for converting words to unique identifiers and vice versa. They are used to manage the vocabulary of the target sequences.
- self.start_token and self.end_token represent the identifiers of the start and end tokens of the sequence. They are used to indicate when to start and stop generating the translation.
- self.embedding is an embedding layer to convert token identifiers into embedding vectors.
- self.rnn is an RNN layer (GRU) used to process the target sequences.
- self.attention is the attention layer (CrossAttention) used to focus on the context during translation generation.
- self.output_layer is a dense layer that predicts the next token based on the decoder outputs.
The call method of the decoder takes the encoded context context, input tokens x, decoder state state, and a return_state option. It performs the following operations:
1. Convert input tokens into embedding vectors using the embedding layer.
2. Process the input sequence with the RNN layer to obtain the output sequence x.
3. Use the attention layer to focus on the relevant context during translation generation.
4. Predict the next token with the output layer.
The get_initial_state method is used to initialize the decoder state before translation. It returns the start token for each batch sequence, initializes the "done" variable to false for all sequences, and returns the initial state of the RNN.
The tokens_to_text method converts tokens to text using the reversed dictionary self.id_to_word. It joins the words to form a sentence and removes the start and end tokens.
The get_next_token method is used to predict the next token during translation generation. It takes the context, the next token, the decoder state, the "done" variable (indicating if a sequence is finished), and a temperature option for random generation. If the temperature is 0, the token is chosen with the highest probability (deterministic mode). Otherwise, the token is chosen randomly based on the logits (stochastic mode). This method is used to iterate over the tokens and generate the complete translation word by word.
The Model
In this section, we create a class Translator to combine the encoder and decoder into a complete translation model. The Translator class inherits from tf.keras.Model, which allows us to define the call method to perform translation.
The call method takes a tuple inputs containing the context and the target sequence x as input. It performs the following operations:
1. Execute the encoder to obtain the encoded context from the input context (context = self.encoder(context)).
2. Execute the decoder to obtain the output logits using the encoded context and the target sequence (logits = self.decoder(context, x)).
We also define a translation method (translate) for the Translator model. This method takes raw text as input and returns its translation using the trained model. It uses the encoder to convert the raw text into its encoded representation (context = self.encoder.convert_input(texts)), and then uses the decoder to generate the translation word by word using the get_next_token method of the decoder.
We also add a method to visualize the attention during translation (plot_attention). This method takes raw text as input, uses the model to translate it, and displays the attention weights on a matrix to visualize which parts of the context were used to generate each word of the translation.
Training
In this subsection, we define custom loss and accuracy functions for the model, tailored to the sequence-to-sequence training process.
- The masked_loss function calculates the loss while ignoring padding tokens. This is necessary because the target sequences can have different lengths and are padded with padding tokens. By masking these padding tokens, the loss is only calculated on relevant tokens.
- The masked_acc function also calculates accuracy while ignoring padding tokens. Just like masked loss, masked accuracy ensures that the metric is only calculated on relevant tokens and ignores padding tokens.
Next, we compile the model using an optimizer, masked loss function, and masked metrics. We use the Adam optimizer for weight updates, and we use the masked loss and accuracy functions to evaluate the model's errors and monitor its performance during training.
Finally, we evaluate the model's performance on a validation dataset to see its initial performance before training.
Then, we use the fit method to train the model on the training data. We repeat the training data for multiple epochs and use validation to monitor performance. We also use the tf.keras.callbacks.EarlyStopping callback to stop training if the loss does not improve for a certain number of consecutive epochs. This prevents unnecessary overfitting and allows us to choose the best model based on its performance on the validation data.
Results Visualization
In this subsection, we visualize the training results by plotting the loss and accuracy curves during training. This allows us to see how the loss and accuracy change over epochs and helps in evaluating the model's performance.
Translation
Finally, in this subsection, we add a translation method to the Translator class. This method takes raw text as input and returns its translation using the trained model.
We use the encoder to convert the raw text into its encoded representation. Then, we initialize the variables for the token generation loop and iterate to generate the next token until reaching the maximum length of the output or until all sequences are finished. We use the get_next_token method of the decoder to generate the next token based on the attention weights computed by the attention layer. Finally, we concatenate the lists of tokens to obtain the complete translation and return it.
We also add a plot_attention method to visualize the attention weights during translation. This method takes raw text as input, uses the model to translate it, and displays the attention weights on a matrix to visualize which parts of the context were used to generate each word of the translation.
Visualizing Attention
In this subsection, we test the visualization of attention weights during translation. We use the plot_attention method of the model to display the attention weights between the input text and the generated translation. We first test on a short example and then on a longer text.
Results Analysis
In this section, we examine the training results and perform various analyses on the model.
Gradient Histogram
This plot will give you an idea of the magnitude of gradients during training. We display a histogram of the gradient norms to get an idea of their magnitude during training. This can help us check if the gradients are too small or too large, which could affect the convergence of training.
Epoch Loss Curve
We plot a curve to visualize the evolution of training loss and validation loss over epochs. This allows us to see how the loss changes during training and identify any overfitting or underfitting trends.
Loss vs. Time Curve
We record the time taken for each training epoch and plot a curve to visualize the loss against the elapsed time. This allows us to see if the loss gradually decreases over time and if the training progresses efficiently.
Histogram of Loss Distribution
We plot a histogram to visualize the distribution of loss values during training. This can give us an idea of the variability of the loss and the stability of the training process.
Results Recording
Finally, we save the trained model using the save method of Keras, as well as the training history as a pickle file for future reuse.
Preprocessing
In this subsection, we preprocess the text before using it to train our translation model. The purpose of preprocessing is to normalize the text by eliminating variations due to special characters and case, and transforming it into a sequence of tokens.
We use the example text "Êtes-vous un chercheur en Intelligence Artificielle?" to illustrate the normalization process. First, we use the
tf_text.normalize_utf8() function to decompose the characters into their compatible forms (NFKD) and transform them into normalized Unicode text. Then, we convert the text to lowercase and remove any character that is not an English alphabet letter, space, period, question mark, comma, or exclamation point. We also add spaces around punctuation to separate them as distinct tokens.
Finally, we add special tokens
[START] and [END] around the text to indicate the beginning and end of the token sequence. This step is essential for translation models to know when to start and end text generation.
Preprocessing standardizes the text and transforms it into a sequence of tokens ready to be used by the translation model.
Vectorization
In this subsection, we perform the vectorization of textual data to prepare the input for our translation model. Vectorization involves converting words into numerical indices (tokens) using a vocabulary dictionary.
We define a maximum size for the
vocabulary (max_vocab_size) that will limit the number of words considered for indexing. Then, we create two text processors, one for context (English) and the other for the target (French).
Each processor is a text vectorization layer, which takes the normalized text (from the previous subsection) and transforms it into sequences of tokens. We use the tf.keras.layers.TextVectorization function for this, specifying the normalization function, the maximum vocabulary size, and the option ragged=True to indicate that the sequences will have variable lengths.
Next, we "adapt" the text processors to the training data using the .adapt() method with the training dataset. This allows the text processors to learn the vocabulary using the training data.
We then display the first 10 words of the vocabulary to verify what the text processors have learned.
Finally, we use the text processors to convert the examples of contextual strings into sequences of numerical tokens. This allows us to check if tokenization is working correctly and to display a visual representation of the generated tokens and their mask (where tokens are present and where they are not).
Vectorization prepares the textual data by converting words into numerical indices (tokens) for processing by the translation model.
The Encoder/Decoder Model
In this section, we define the English-French translation model using the encoder-decoder architecture. This model is a commonly used architecture for translation and text generation tasks.
We use encoding and attention layers to capture the semantic information from the input sentences and generate the translations as output.
UNITS represents the number of units (neurons) for the encoding and attention layers. This parameter is set to 256, but it can be adjusted based on the needs and complexity of the model.
The encoder-decoder model is a powerful architecture that can be trained to generate high-quality translations based on the training sentence pairs. The combination of text vectorization, preprocessing, and the model architecture will result in an efficient and accurate translation system.
The Encoder
In this subsection, we implement the custom encoder layer. The encoder transforms a sequence of text into a sequence of vectors. It uses two main components: the embedding layer and a bidirectional RNN layer.
- The embedding layer (self.embedding) is used to convert tokens (words) into dense vectors. This allows representing the text in a continuous way and facilitates learning the relationships between words. The embedding is specified by the number of units (units) that each word will be represented with.
- The bidirectional RNN layer (self.rnn) processes the embedding vectors sequentially. It takes the embedding vectors as input and returns a sequence of hidden states, capturing the contextual information in both forward and backward directions of the text. The merge_mode='sum' option means that the outputs from both directions are summed.
The call method of the encoder takes an input sequence x and performs the following operations:
1. Convert tokens into embedding vectors using the embedding layer.
2. Process the embedding vectors with the bidirectional RNN layer (self.rnn).
3. Return the processed sequence.
The convert_input method is used to convert raw text into its encoded representation using the encoder. It takes a text as input, converts it into tokens, and passes it to the encoder to obtain the corresponding embedding vectors.
The Attention Layer
In this subsection, we define the custom attention layer (CrossAttention). This layer allows the model to focus on specific parts of the context during translation.
- The layer uses tf.keras.layers.MultiHeadAttention (self.mha), which is an attention mechanism that processes information in multiple ways simultaneously.
- self.layernorm is a normalization layer that improves the stability of learning.
- self.add combines the attention outputs with the previous outputs.
The call method of the attention layer takes a sequence x and the context context as input. It performs the following operations:
1. Obtain the attention weights and output using tf.keras.layers.MultiHeadAttention.
2. Combine the outputs using self.add.
3. Normalize the outputs using self.layernorm.
This layer is used in the decoder to focus on the relevant context during translation generation.
The Decoder
In this subsection, we implement the custom decoder class. The decoder takes the encoded context and generates a target sequence (translation) word by word.
The decoder has several important components:
- self.word_to_id and self.id_to_word are layers for converting words to unique identifiers and vice versa. They are used to manage the vocabulary of the target sequences.
- self.start_token and self.end_token represent the identifiers of the start and end tokens of the sequence. They are used to indicate when to start and stop generating the translation.
- self.embedding is an embedding layer to convert token identifiers into embedding vectors.
- self.rnn is an RNN layer (GRU) used to process the target sequences.
- self.attention is the attention layer (CrossAttention) used to focus on the context during translation generation.
- self.output_layer is a dense layer that predicts the next token based on the decoder outputs.
The call method of the decoder takes the encoded context context, input tokens x, decoder state state, and a return_state option. It performs the following operations:
1. Convert input tokens into embedding vectors using the embedding layer.
2. Process the input sequence with the RNN layer to obtain the output sequence x.
3. Use the attention layer to focus on the relevant context during translation generation.
4. Predict the next token with the output layer.
The get_initial_state method is used to initialize the decoder state before translation. It returns the start token for each batch sequence, initializes the "done" variable to false for all sequences, and returns the initial state of the RNN.
The tokens_to_text method converts tokens to text using the reversed dictionary self.id_to_word. It joins the words to form a sentence and removes the start and end tokens.
The get_next_token method is used to predict the next token during translation generation. It takes the context, the next token, the decoder state, the "done" variable (indicating if a sequence is finished), and a temperature option for random generation. If the temperature is 0, the token is chosen with the highest probability (deterministic mode). Otherwise, the token is chosen randomly based on the logits (stochastic mode). This method is used to iterate over the tokens and generate the complete translation word by word.
The Model
In this section, we create a class Translator to combine the encoder and decoder into a complete translation model. The Translator class inherits from tf.keras.Model, which allows us to define the call method to perform translation.
The call method takes a tuple inputs containing the context and the target sequence x as input. It performs the following operations:
1. Execute the encoder to obtain the encoded context from the input context (context = self.encoder(context)).
2. Execute the decoder to obtain the output logits using the encoded context and the target sequence (logits = self.decoder(context, x)).
We also define a translation method (translate) for the Translator model. This method takes raw text as input and returns its translation using the trained model. It uses the encoder to convert the raw text into its encoded representation (context = self.encoder.convert_input(texts)), and then uses the decoder to generate the translation word by word using the get_next_token method of the decoder.
We also add a method to visualize the attention during translation (plot_attention). This method takes raw text as input, uses the model to translate it, and displays the attention weights on a matrix to visualize which parts of the context were used to generate each word of the translation.
Training
In this subsection, we define custom loss and accuracy functions for the model, tailored to the sequence-to-sequence training process.
- The masked_loss function calculates the loss while ignoring padding tokens. This is necessary because the target sequences can have different lengths and are padded with padding tokens. By masking these padding tokens, the loss is only calculated on relevant tokens.
- The masked_acc function also calculates accuracy while ignoring padding tokens. Just like masked loss, masked accuracy ensures that the metric is only calculated on relevant tokens and ignores padding tokens.
Next, we compile the model using an optimizer, masked loss function, and masked metrics. We use the Adam optimizer for weight updates, and we use the masked loss and accuracy functions to evaluate the model's errors and monitor its performance during training.
Finally, we evaluate the model's performance on a validation dataset to see its initial performance before training.
Then, we use the fit method to train the model on the training data. We repeat the training data for multiple epochs and use validation to monitor performance. We also use the tf.keras.callbacks.EarlyStopping callback to stop training if the loss does not improve for a certain number of consecutive epochs. This prevents unnecessary overfitting and allows us to choose the best model based on its performance on the validation data.
Results Visualization
In this subsection, we visualize the training results by plotting the loss and accuracy curves during training. This allows us to see how the loss and accuracy change over epochs and helps in evaluating the model's performance.
Translation
Finally, in this subsection, we add a translation method to the Translator class. This method takes raw text as input and returns its translation using the trained model.
We use the encoder to convert the raw text into its encoded representation. Then, we initialize the variables for the token generation loop and iterate to generate the next token until reaching the maximum length of the output or until all sequences are finished. We use the get_next_token method of the decoder to generate the next token based on the attention weights computed by the attention layer. Finally, we concatenate the lists of tokens to obtain the complete translation and return it.
We also add a plot_attention method to visualize the attention weights during translation. This method takes raw text as input, uses the model to translate it, and displays the attention weights on a matrix to visualize which parts of the context were used to generate each word of the translation.
Visualizing Attention
In this subsection, we test the visualization of attention weights during translation. We use the plot_attention method of the model to display the attention weights between the input text and the generated translation. We first test on a short example and then on a longer text.
Results Analysis
In this section, we examine the training results and perform various analyses on the model.
Gradient Histogram
This plot will give you an idea of the magnitude of gradients during training. We display a histogram of the gradient norms to get an idea of their magnitude during training. This can help us check if the gradients are too small or too large, which could affect the convergence of training.
Epoch Loss Curve
We plot a curve to visualize the evolution of training loss and validation loss over epochs. This allows us to see how the loss changes during training and identify any overfitting or underfitting trends.
Loss vs. Time Curve
We record the time taken for each training epoch and plot a curve to visualize the loss against the elapsed time. This allows us to see if the loss gradually decreases over time and if the training progresses efficiently.
Histogram of Loss Distribution
We plot a histogram to visualize the distribution of loss values during training. This can give us an idea of the variability of the loss and the stability of the training process.
Results Recording
Finally, we save the trained model using the save method of Keras, as well as the training history as a pickle file for future reuse.
The Encoder/Decoder Model
In this subsection, we implement the custom encoder layer. The encoder transforms a sequence of text into a sequence of vectors. It uses two main components: the embedding layer and a bidirectional RNN layer.
- The embedding layer (
self.embedding) is used to convert tokens (words) into dense vectors. This allows representing the text in a continuous way and facilitates learning the relationships between words. The embedding is specified by the number of units (units) that each word will be represented with.
- The bidirectional RNN layer (
self.rnn) processes the embedding vectors sequentially. It takes the embedding vectors as input and returns a sequence of hidden states, capturing the contextual information in both forward and backward directions of the text. The merge_mode='sum' option means that the outputs from both directions are summed.
The
call method of the encoder takes an input sequence x and performs the following operations:
1. Convert tokens into embedding vectors using the embedding layer.
2. Process the embedding vectors with the bidirectional RNN layer (
self.rnn).
3. Return the processed sequence.
The
convert_input method is used to convert raw text into its encoded representation using the encoder. It takes a text as input, converts it into tokens, and passes it to the encoder to obtain the corresponding embedding vectors.
The Attention Layer
In this subsection, we define the custom attention layer (CrossAttention). This layer allows the model to focus on specific parts of the context during translation.
- The layer uses tf.keras.layers.MultiHeadAttention (self.mha), which is an attention mechanism that processes information in multiple ways simultaneously.
- self.layernorm is a normalization layer that improves the stability of learning.
- self.add combines the attention outputs with the previous outputs.
The call method of the attention layer takes a sequence x and the context context as input. It performs the following operations:
1. Obtain the attention weights and output using tf.keras.layers.MultiHeadAttention.
2. Combine the outputs using self.add.
3. Normalize the outputs using self.layernorm.
This layer is used in the decoder to focus on the relevant context during translation generation.
The Decoder
In this subsection, we implement the custom decoder class. The decoder takes the encoded context and generates a target sequence (translation) word by word.
The decoder has several important components:
- self.word_to_id and self.id_to_word are layers for converting words to unique identifiers and vice versa. They are used to manage the vocabulary of the target sequences.
- self.start_token and self.end_token represent the identifiers of the start and end tokens of the sequence. They are used to indicate when to start and stop generating the translation.
- self.embedding is an embedding layer to convert token identifiers into embedding vectors.
- self.rnn is an RNN layer (GRU) used to process the target sequences.
- self.attention is the attention layer (CrossAttention) used to focus on the context during translation generation.
- self.output_layer is a dense layer that predicts the next token based on the decoder outputs.
The call method of the decoder takes the encoded context context, input tokens x, decoder state state, and a return_state option. It performs the following operations:
1. Convert input tokens into embedding vectors using the embedding layer.
2. Process the input sequence with the RNN layer to obtain the output sequence x.
3. Use the attention layer to focus on the relevant context during translation generation.
4. Predict the next token with the output layer.
The get_initial_state method is used to initialize the decoder state before translation. It returns the start token for each batch sequence, initializes the "done" variable to false for all sequences, and returns the initial state of the RNN.
The tokens_to_text method converts tokens to text using the reversed dictionary self.id_to_word. It joins the words to form a sentence and removes the start and end tokens.
The get_next_token method is used to predict the next token during translation generation. It takes the context, the next token, the decoder state, the "done" variable (indicating if a sequence is finished), and a temperature option for random generation. If the temperature is 0, the token is chosen with the highest probability (deterministic mode). Otherwise, the token is chosen randomly based on the logits (stochastic mode). This method is used to iterate over the tokens and generate the complete translation word by word.
The Model
In this section, we create a class Translator to combine the encoder and decoder into a complete translation model. The Translator class inherits from tf.keras.Model, which allows us to define the call method to perform translation.
The call method takes a tuple inputs containing the context and the target sequence x as input. It performs the following operations:
1. Execute the encoder to obtain the encoded context from the input context (context = self.encoder(context)).
2. Execute the decoder to obtain the output logits using the encoded context and the target sequence (logits = self.decoder(context, x)).
We also define a translation method (translate) for the Translator model. This method takes raw text as input and returns its translation using the trained model. It uses the encoder to convert the raw text into its encoded representation (context = self.encoder.convert_input(texts)), and then uses the decoder to generate the translation word by word using the get_next_token method of the decoder.
We also add a method to visualize the attention during translation (plot_attention). This method takes raw text as input, uses the model to translate it, and displays the attention weights on a matrix to visualize which parts of the context were used to generate each word of the translation.
Training
In this subsection, we define custom loss and accuracy functions for the model, tailored to the sequence-to-sequence training process.
- The masked_loss function calculates the loss while ignoring padding tokens. This is necessary because the target sequences can have different lengths and are padded with padding tokens. By masking these padding tokens, the loss is only calculated on relevant tokens.
- The masked_acc function also calculates accuracy while ignoring padding tokens. Just like masked loss, masked accuracy ensures that the metric is only calculated on relevant tokens and ignores padding tokens.
Next, we compile the model using an optimizer, masked loss function, and masked metrics. We use the Adam optimizer for weight updates, and we use the masked loss and accuracy functions to evaluate the model's errors and monitor its performance during training.
Finally, we evaluate the model's performance on a validation dataset to see its initial performance before training.
Then, we use the fit method to train the model on the training data. We repeat the training data for multiple epochs and use validation to monitor performance. We also use the tf.keras.callbacks.EarlyStopping callback to stop training if the loss does not improve for a certain number of consecutive epochs. This prevents unnecessary overfitting and allows us to choose the best model based on its performance on the validation data.
Results Visualization
In this subsection, we visualize the training results by plotting the loss and accuracy curves during training. This allows us to see how the loss and accuracy change over epochs and helps in evaluating the model's performance.
Translation
Finally, in this subsection, we add a translation method to the Translator class. This method takes raw text as input and returns its translation using the trained model.
We use the encoder to convert the raw text into its encoded representation. Then, we initialize the variables for the token generation loop and iterate to generate the next token until reaching the maximum length of the output or until all sequences are finished. We use the get_next_token method of the decoder to generate the next token based on the attention weights computed by the attention layer. Finally, we concatenate the lists of tokens to obtain the complete translation and return it.
We also add a plot_attention method to visualize the attention weights during translation. This method takes raw text as input, uses the model to translate it, and displays the attention weights on a matrix to visualize which parts of the context were used to generate each word of the translation.
Visualizing Attention
In this subsection, we test the visualization of attention weights during translation. We use the plot_attention method of the model to display the attention weights between the input text and the generated translation. We first test on a short example and then on a longer text.
Results Analysis
In this section, we examine the training results and perform various analyses on the model.
Gradient Histogram
This plot will give you an idea of the magnitude of gradients during training. We display a histogram of the gradient norms to get an idea of their magnitude during training. This can help us check if the gradients are too small or too large, which could affect the convergence of training.
Epoch Loss Curve
We plot a curve to visualize the evolution of training loss and validation loss over epochs. This allows us to see how the loss changes during training and identify any overfitting or underfitting trends.
Loss vs. Time Curve
We record the time taken for each training epoch and plot a curve to visualize the loss against the elapsed time. This allows us to see if the loss gradually decreases over time and if the training progresses efficiently.
Histogram of Loss Distribution
We plot a histogram to visualize the distribution of loss values during training. This can give us an idea of the variability of the loss and the stability of the training process.
Results Recording
Finally, we save the trained model using the save method of Keras, as well as the training history as a pickle file for future reuse.
In this subsection, we implement the custom decoder class. The decoder takes the encoded context and generates a target sequence (translation) word by word.
The decoder has several important components:
-
self.word_to_id and self.id_to_word are layers for converting words to unique identifiers and vice versa. They are used to manage the vocabulary of the target sequences.
-
self.start_token and self.end_token represent the identifiers of the start and end tokens of the sequence. They are used to indicate when to start and stop generating the translation.
-
self.embedding is an embedding layer to convert token identifiers into embedding vectors.
-
self.rnn is an RNN layer (GRU) used to process the target sequences.
-
self.attention is the attention layer (CrossAttention) used to focus on the context during translation generation.
-
self.output_layer is a dense layer that predicts the next token based on the decoder outputs.
The
call method of the decoder takes the encoded context context, input tokens x, decoder state state, and a return_state option. It performs the following operations:
1. Convert input tokens into embedding vectors using the embedding layer.
2. Process the input sequence with the RNN layer to obtain the output sequence
x.
3. Use the attention layer to focus on the relevant context during translation generation.
4. Predict the next token with the output layer.
The
get_initial_state method is used to initialize the decoder state before translation. It returns the start token for each batch sequence, initializes the "done" variable to false for all sequences, and returns the initial state of the RNN.
The
tokens_to_text method converts tokens to text using the reversed dictionary self.id_to_word. It joins the words to form a sentence and removes the start and end tokens.
The
get_next_token method is used to predict the next token during translation generation. It takes the context, the next token, the decoder state, the "done" variable (indicating if a sequence is finished), and a temperature option for random generation. If the temperature is 0, the token is chosen with the highest probability (deterministic mode). Otherwise, the token is chosen randomly based on the logits (stochastic mode). This method is used to iterate over the tokens and generate the complete translation word by word.
The Model
In this section, we create a class
Translator to combine the encoder and decoder into a complete translation model. The Translator class inherits from tf.keras.Model, which allows us to define the call method to perform translation.
The
call method takes a tuple inputs containing the context and the target sequence x as input. It performs the following operations:
1. Execute the encoder to obtain the encoded context from the input context (
context = self.encoder(context)).
2. Execute the decoder to obtain the output logits using the encoded context and the target sequence (
logits = self.decoder(context, x)).
We also define a translation method (
translate) for the Translator model. This method takes raw text as input and returns its translation using the trained model. It uses the encoder to convert the raw text into its encoded representation (context = self.encoder.convert_input(texts)), and then uses the decoder to generate the translation word by word using the get_next_token method of the decoder.
We also add a method to visualize the attention during translation (
plot_attention). This method takes raw text as input, uses the model to translate it, and displays the attention weights on a matrix to visualize which parts of the context were used to generate each word of the translation.
Training
In this subsection, we define custom loss and accuracy functions for the model, tailored to the sequence-to-sequence training process.
- The masked_loss function calculates the loss while ignoring padding tokens. This is necessary because the target sequences can have different lengths and are padded with padding tokens. By masking these padding tokens, the loss is only calculated on relevant tokens.
- The masked_acc function also calculates accuracy while ignoring padding tokens. Just like masked loss, masked accuracy ensures that the metric is only calculated on relevant tokens and ignores padding tokens.
Next, we compile the model using an optimizer, masked loss function, and masked metrics. We use the Adam optimizer for weight updates, and we use the masked loss and accuracy functions to evaluate the model's errors and monitor its performance during training.
Finally, we evaluate the model's performance on a validation dataset to see its initial performance before training.
Then, we use the fit method to train the model on the training data. We repeat the training data for multiple epochs and use validation to monitor performance. We also use the tf.keras.callbacks.EarlyStopping callback to stop training if the loss does not improve for a certain number of consecutive epochs. This prevents unnecessary overfitting and allows us to choose the best model based on its performance on the validation data.
Results Visualization
In this subsection, we visualize the training results by plotting the loss and accuracy curves during training. This allows us to see how the loss and accuracy change over epochs and helps in evaluating the model's performance.
Translation
Finally, in this subsection, we add a translation method to the Translator class. This method takes raw text as input and returns its translation using the trained model.
We use the encoder to convert the raw text into its encoded representation. Then, we initialize the variables for the token generation loop and iterate to generate the next token until reaching the maximum length of the output or until all sequences are finished. We use the get_next_token method of the decoder to generate the next token based on the attention weights computed by the attention layer. Finally, we concatenate the lists of tokens to obtain the complete translation and return it.
We also add a plot_attention method to visualize the attention weights during translation. This method takes raw text as input, uses the model to translate it, and displays the attention weights on a matrix to visualize which parts of the context were used to generate each word of the translation.
Visualizing Attention
In this subsection, we test the visualization of attention weights during translation. We use the plot_attention method of the model to display the attention weights between the input text and the generated translation. We first test on a short example and then on a longer text.
Results Analysis
In this section, we examine the training results and perform various analyses on the model.
Gradient Histogram
This plot will give you an idea of the magnitude of gradients during training. We display a histogram of the gradient norms to get an idea of their magnitude during training. This can help us check if the gradients are too small or too large, which could affect the convergence of training.
Epoch Loss Curve
We plot a curve to visualize the evolution of training loss and validation loss over epochs. This allows us to see how the loss changes during training and identify any overfitting or underfitting trends.
Loss vs. Time Curve
We record the time taken for each training epoch and plot a curve to visualize the loss against the elapsed time. This allows us to see if the loss gradually decreases over time and if the training progresses efficiently.
Histogram of Loss Distribution
We plot a histogram to visualize the distribution of loss values during training. This can give us an idea of the variability of the loss and the stability of the training process.
Results Recording
Finally, we save the trained model using the save method of Keras, as well as the training history as a pickle file for future reuse.
In this subsection, we test the visualization of attention weights during translation. We use the
plot_attention method of the model to display the attention weights between the input text and the generated translation. We first test on a short example and then on a longer text.
Results Analysis
In this section, we examine the training results and perform various analyses on the model.
Gradient Histogram
This plot will give you an idea of the magnitude of gradients during training. We display a histogram of the gradient norms to get an idea of their magnitude during training. This can help us check if the gradients are too small or too large, which could affect the convergence of training.
Epoch Loss Curve
We plot a curve to visualize the evolution of training loss and validation loss over epochs. This allows us to see how the loss changes during training and identify any overfitting or underfitting trends.
Loss vs. Time Curve
We record the time taken for each training epoch and plot a curve to visualize the loss against the elapsed time. This allows us to see if the loss gradually decreases over time and if the training progresses efficiently.
Histogram of Loss Distribution
We plot a histogram to visualize the distribution of loss values during training. This can give us an idea of the variability of the loss and the stability of the training process.
Results Recording
Finally, we save the trained model using the save method of Keras, as well as the training history as a pickle file for future reuse.
We plot a histogram to visualize the distribution of loss values during training. This can give us an idea of the variability of the loss and the stability of the training process.